Pages

Tuesday, October 29, 2024

Christmas Baubles

Since it's been such a long while that I've put some effort into a card, I thought I would participate in a couple of blog challenges to get the creative juices flowing again.  This one was challenging for several reasons, including not wanting to stick to the foam I have it mounted on using my tried and true tape runner. So I decided to use gel glue to hold things in place and that changed the colors of the inks on my stitched panel and ornaments which I then had to go back and touch up. I'm still relatively happy with how it turned out.

I started by stenciling and then stitching the Taylored Expressions Beautiful Baubles. I poked the stitching holes with a needle, trying to mimic the spacing of my background die. This set did not originally come with matching dies so I fussy cut them along with the little hanger/toppers that I heat embossed and then finished off with jump rings and baker's twine.

Next, I ran my A2 white panel trough my die cut machine with the PaperTrey Ink Cover Plate: Stitched Florals die.  I then inked my background, stitched with 2 strands of DMC floss and then spattered with water and bleed proof white.  

The vellum banner was stamped with VersaMark and heat embossed with black powder.  The lower left bauble and panel are bumped up on foam and mounted to coordinating background paper from my stash.

I would like to enter this card into the following challenges:

Fans of Taylored Expressions FB Group: Colors: Jalepeno, Cherry Pop + Your Choice


Wednesday, January 10, 2024

A Pair of Anniversaries

I've made two anniversary cards for two very special couples this month; my in-laws, Bill and Jean's 72nd and my dear friends, Arthur and Donna's 40th.

I'm very much out of practice making cards, much less coming up with ideas for them and so I decided to case a card made by someone who's beautiful creations speak to my imagination like no other's.  I'm using what I have on hand though, so really, the only thing that's similar is the flower arrangement.

Firstly, I cut turquoise cardstock using the PTI Border Bling: Blooming Hearts large die, used my corner rounder and then sponged a light layer of Picket Fence Distress Ink right at the cut design.

Next, I cut a small panel of white cardstock to fit within the dotted design of the diecut.  I then stenciled vertical stripes using Salty Ocean Distress Ink and PTI's Watercolor Plaid stencils.  The sentiment is an old, wooden Hampton Art stamp.

The florals were made by cutting watercolor paper with PTI's Into The Blooms: Dahlia, Birthday Bouquet and Sizzix: Branch w/Leaves, sponged with Mowed Lawn, Peeled Paint, Twisted Citron, Mustard Seed and Wild Honey Distress Inks.  All were spattered with water and Vintage Photo DI.

Lastly, I mounted my card front to a 4.25 x 5.50 inch card base, added a button and bow using PTI's Festive Birds dies and then some yellow sequins for a bit of bling.

Saturday, April 1, 2023

PTI Designer's Challenge: Birthday Tag

Hello Crafty Friends and thank you for stopping by.  Today I have a little project that I made for the Papertrey Ink Designer's Challenge with the theme of Birthday Tag.

I adore this Sweet Celebrations cupcake that I have framed with one of the Love To Layer: Ovals dies. I added some stitching and used part of a sentiment from the Dandelion Wishes Sentiments stamp set.  Isn't the strawberry just so cute?

A little bit of glitter and some trims to finish and, boom, done.

Hope you're having a great day.  See you again soon!

Laura

Thursday, November 17, 2022

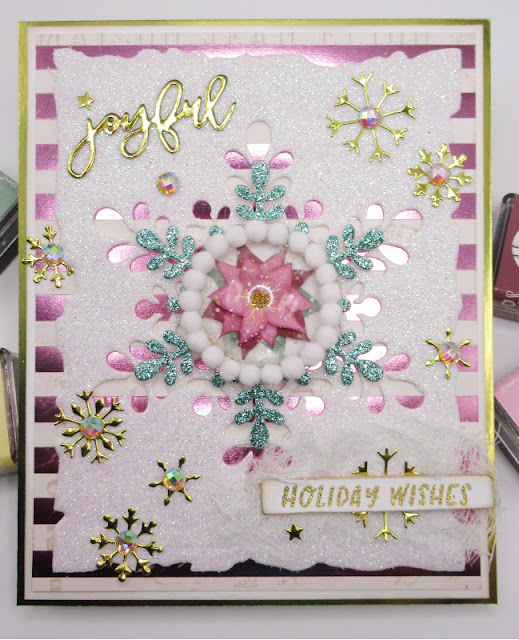
Joyful Holiday Wishes

Hello Crafty Friends and Welcome to my Blog.  It's been quite a while since I've posted and I decided to take the opportunity of Papertrey Ink rebooting one of their challenges to jump back into it.  It's been a busy year of working on our Arizona house to sell it and move back to Wisconsin.  We're still working on getting the new place to feel like home but we are so glad to be back.

I made this card for the PTI challenge, "Melissa's Fab Friday Feature".  The challenge is to "recreate Melissa's card with your own personality" using Papertrey Ink products.  

So here is my spin on it, using the same color pallet and papers that I've been using to make this year's Christmas Cards.  This year I'm all about the pinks, bluey greens and gold with lots of shine and sparkle.


PTI products used: 

Dies - Border Bling: Snowflakes, Joyful Florals, Love To Layer: Torn Edges, Snowfall Style, Words To Live By: Joyful

Stamps - Joyful Florals, Words To Live By: Joyful

Inks - Harvest Gold, Lovely Lady, Ocean Tides, Scarlet Jewel

Friday, September 17, 2021

TE 13th Birthday Challenge

Good Morning My Creative Friends and HAPPY FRIDAY!  Welcome to my little corner of the crafting universe, I hope you've had a great week.

HAPPY 13th BIRTHDAY TAYLORED EXPRESSIONS!

Today I'm sharing my entry for the Taylored Expressions 13th Birthday challenge.  Of the four challenges taking place, I chose to enter challenge #1 which is a Toffee (kraft) & Rainbow combo.  I know that most people will go with the ROYGBP, bright and cheery colors (which I LOVE) but I decided to change it up a little and include the toffee color in my rainbow.

I started out with the TE Over The Rainbow dies, choosing a pallet of soothing colors that I would like to use for a future baby card.

With the TE Over The Rainbow sentiments stamps, I added "You make me happy when skies are grey" to the edge of the sun and heat embossed with white powder.

The sentiment "Hello, friend" is from the TE  Butterfly Sweet Sentiments set.  For some simple finishing touches, I sewed around the card edges and added Star Dust Stickles to the edges of the white clouds.  I had thought about adding sequins or raindrops but after playing with them for a while, it took away from the sweet simplicity I was looking for.  Oh well...

Thank You so much for stopping by and taking a look.  I hope you have a fantastic weekend and I look forward to our next visit.

Laura

Taylored Expressions13th Birthday FB Entry

Friday, September 3, 2021

Winter Fox Canning Jar Snow Globe

 Hello There My Crafty Friends!  Happy Friday and Welcome to my little corner of the crafting world!

Tomorrow the hubster leaves for his annual finishing trip.  What's a girl to do for an entire week all by herself?  Absolutely anything and nothing she feels like doing.  I'm starting out by stopping by my favorite country goodies store, The Rustic Hutch.  They're having a sale and I'll be going there directly after dropping the guys at the airport.  :D  I also plan to work on cards.  I'm late in starting my Christmas cards this year, so it's time to get a move-on.

For today's project, I knew I was going to create a snow globe and for some reason just felt it had to be a jar design.  Must be that country/farmhouse style, I love so much, just coming out of me.  For that, I turned to my Cricut.  I used the negative cut for the jar itself and the positive cut for the lid.  I used my scoring board for the lines in the lid and an embossing folder for the wood grain around the jar cut.

The sweet fox, trees and words are a set from Papertrey Ink called Winter Fox and the snowflake is Snowfall Style 1 dies, also by Papertrey Ink.  The swirly background is a very pretty die by Ellen Hutson called Twirling Flurries.

Don't know if you noticed in the first picture, that my jar panel is down and to the right side of the card base.  This caused me a lot of stress because, even though I like how it looked, it wasn't centered.  I spent way too much time obsessing over this but decided it's about time I step out of a few of my comfort zones.

Here you can see some of my snowy, glittery shaker bits.  I used 5 different sparkly things; little clay snowflakes, fine white glitter, shaved ice, clear sequins and glass glitter.

What do you think?  Please let me know in the comments section and, while you're there, any photography tips you'd be willing to give are greatly appreciated.  Especially when it comes to brightening up my photos.

Thank you so much for stopping by.  I hope you have a great weekend.

Laura

I would like to enter my card into the following challenges.  Please click the links.

Papertrey Ink: Fab Friday, Snow Globe
Double D: Anything With A Tail
Happy Little Stampers: Watercolor AG


Wednesday, September 1, 2021

Thinking Of You Bouquet

 Happy Wednesday and, while we're at it, Happy September 1st. my Crafty Friends!  Welcome to my little corner of the crafting world.

Remember in my last post how I said I love this time of year?  Well, I do but the reality is setting in and things are already getting hectic.  I've started making some of my holiday gifts, creating a new crochet pattern for the sweetest candy cane pillows, stitching glass beads on felt pine trees which will be car air fresheners/scented ornaments, I have yet to decide on a design for my Christmas cards and I have less than three months to get it all done.  Yes, I celebrate Thanksmas.  My family converges on my home from various states as far away as Pennsylvania.  This way, there is no argument or tug of war with the in-law families about who's going to which house on Christmas.  Thanksmas is mine.

So with all of that going on, I still have to do the normal day to day stuff; clean the house, make dinner, do dishes, laundry and make cards for all of the rest of the celebrations of life.  You know how it is.

For this card I couldn't wait to try out some of my new goodies from the Papertrey Ink sale.  I finally got the Birthday Bouquet set that I've had my eye on FOREVER along with the Skinny Diagonal Frames which I have impressed into the panel.

I first inked up the flowers with Distress Inks using the color scheme from the MFT color challenge.  After much hemming and hawing, I decided to make the leaves and stems grey and I actually love this look.  I'm so traditional, it's tragic so I'm really glad I jumped out of my comfort zone for a change.

I then die cut everything with the coordinating dies and then distress spattered with white and black acrylics.  On the impressed panel, I used the three dot stamp from PTI's Winter Fox collection to surround the bouquet.


After adhering everything else down, I stamped the sentiment and then die cut it with the MFT Stitched Sentiment Banner Die and then finished it all off by adding Star Dust Stickles.

What do you think?  Please let me know in the comments section, and while you're there, let me know if you've started getting ready for the holiday season yet.

Thank you so much for stopping by.  I hope you have the best day!

Laura

I would like to enter my card into the following challenges.  Please click on the links.

Papertrey Ink: The Great Cover-Up - Impress A Die Into The Background

My Favorite Things: Color Challenge

Funkie Junkie: Distressing

Simon Says Stamp Monday: Glimmer and Sparkle

Related Posts Plugin for WordPress, Blogger...