Pages

Sunday, May 20, 2012

WOAH! I have been given an award by Anne for my blog.

It's theaward.

I am very honored to receive an award from Anne of Midweek Magnolias Challenge Blog and Anne's Corner, given that she is such a talented crafter and I am an admirer of her work.  Thank you so much Anne!

To accept my award, I need to :


1.  Link back to the person who gave it and thank them for thinking of me, so Thank You so much Anne!  Please head over to her blog and have a look at her gorgeous creations!

2.  Post the award on my blog.


3.  Give the award to 5 bloggers (with less than 200 followers) that I appreciate.


4.  Leave a comment on the blogs of the 5 people I have chosen to let them know.


It wasn't easy to choose just 5 blogs as there are so many very talented crafters out there, but I finally decided to pass this award on to


Cathy-Lynn of Ink, Thread, Paper. A very talented crafter with a fun sense of humor. She has helped me through some new blogger blues. Thank you so much Cathy-Lynn!
Anne of Learning To Jive.  I love her sense of humor and her cards are just lovely.
Karen of Thoughts From the Girls.  I love the imagination that goes into her creations.
Susan of A Garden of Wishes.  Love the vibrant colors and clean designs of her projects.
Kathleen of Kathy's Knook.  I love that each new project is a surprise.

Please go and visit these very talented people who create such beautiful projects.  And thank you once again Anne, you just made my whole week!


♥ Laura C.

Friday, May 18, 2012

Birthday in white

Hello there friends!  Thank you so much for stopping by to see my latest post.
There are 5 challenges that I want to enter this week and trying to get one card to fit into the all of the criteria was not easy. One of them called for "big white space" and another, "make it simple".  Both are WAY out of my comfort zone.  For the big white space I could have kept adding more texture like flowers, leaves, butterflies, etc... However, the make it simple challenge held me back a bit. I hope I came up with a decent balance.


Another challenge this card has been made for requires the colors yellow, orange and blue.  The DP that I used had yellow, blue and pinkish/salmon colored flowers.  I colored over the pink ones with orange Copics.  Once again, my colors aren't showing up as well as they could. You can't really even tell that the eyelets in the tags are blue...  If anyone is willing to share their photography tips, I would be much obliged.


You know how necessity is the mother of invention?  I have no stamps for my Maggies to "sit on" so I tried drawing (lol), die cuts, ribbon...  All of the stuff that we would normally use for a substitute seat, but nothing was working.   So I walked away from the project and somewhere in the middle of a conversation with my dh, I thought "a stone wall" and remembered that I had something that might work.  So, I made the stone wall that Tilda is sitting on with an old metal fireplace stencil that I've had forever.  I filled in the opening by shifting the stencil around and fitting the rocks wherever I could.

If not for the parameters of the challenges, I would have taken my Pumice Stone, Black Soot, Walnut Stain and Tea Dye Distress Inks and gone to town.  Perhaps in another challenge...  :)

Challenges I want to enter with this card:

Midweek Magnolias (Big White Space)
Simon Says Stamp Challenge (Clean & Simple)
Simon Says Stamp and Show (Anything Goes)
The Sketchy Challenges (Kathrin's Sketch)
Magnolia-licious Highlites (Summer and colors of Yellow, Orange & Blue)

Recipe:

stamps: Jam Tilda by Magnolia, Happy Birthday by DOTS
inks: Memento ink pad in black, Copic markers, Distress Inks
DP (designer paper): American Crafts
dies: Sizzix Tattered Florals, QuicKutz sun
punches: Martha Stewart floral punch around the edge, McGill 1" circle
misc: fireplace stencil, seam tape, eyelets, rickrack, Cuttlebug embossing folder (small dot)

Thanks again for stopping by.  Your comments have been so great and I appreciate your feedback.  Until next time, have a great day and an even better tomorrows.

♥ Laura C.

Wednesday, May 16, 2012

Dad's Birthday

I have the worst time coming up with cards for the men in my life!  It seems my brain comes to a complete halt and ideas won't come (which is really bad since the male population of my family is steadily growing).  So, when I was on Cathy Lee's blog looking at her AMAZING creations, I stumbled upon some cards that she made for her golf pals.  Right away I knew I had to steal her idea.  Take a look at her creation by clicking HERE.  I love how she made her card into a golf tee holder.  Such a cool gift!

I did not get as creative as Cathy Lee since I was pressed for time and I didn't want to be so bad as to steal the WHOLE idea.


Anyway, here is my version.  I got out my old QuicKutz dies and went to town.

By the way, Cathy Lee is offering up some great blog candy.  You can get in on that action by clicking on the picture in the right sidebar below the archive list.  There will be 8 winners so I'm crossing my fingers and toes that I'm one of them.

Friday, May 11, 2012

Mother's Day Card

Hello Friends!  I'm so glad you could stop by today and check out my latest creations.  I made this card for my mom for Mother's Day.  I would have posted it sooner but I was afraid mom might visit the blog and see it before she got it.

Unfortunately, my photos don't do the colors justice.  My "photo booth" was thrown out by my dh and so I have to make do until I can make another one.

This little sweetheart is a Magnolia stamp called Tilda With Flowers in Her Hair.  She is supposed to have eggs in her lap but I masked those and added the flowers.  My Magnolia stamp collection is very small but I love them and if I don't have what I need I try to alter things just enough to fit the occasion. For the flowers, I used a little stamp by D.O.T.S. (can't even remember what that stands for) that I've had for years.  I stamped three clusters together to fill her lap.

I made the flowers by die cutting them from white cardstock with the Sizzix Bigz die called Tattered Florals by Tim Holtz.  I've been using that die a LOT lately.  I embossed them with small dots and swirls and then inked them with Distress Inks, also by Tim Holtz.

This is the negative from the trellis frame that I used on the front of the card.  BTW, that trellis came from the Cricut cartridge called Ornamental Iron 2.  I've had it for a while but this was the first time I've used it.  I had forgotten how much cool stuff this cartridge could do.

Thank You so much for stopping by!  More of what I used to make this card is listed below.  Please leave a comment by clicking on the comments link below.  I would love to hear from you.  Don't forget to scroll down a bit to check out my Cupcake Gift Card Holder tutorial.  Have a great day and an even better tomorrow!

♥  Laura C.

Challenges I have entered this card in:

Magnolia Stamp Lovers (flowers)
7 Kids Challenge Blog (the color purple)
Craft Your Passion Challenges (shades of green and purple)

Products I used for this project:

stamps: Tilda with flowers in her hair by Magnolia, Tiny flower cluster by D.O.T.S., Mother's Day sentiment by Inkadinkado
inks: Memento, Copic and Distress Inks
paper: Bazzil Basics and Anna Griffin
dies: Sizzix (flowers and large leaves) Cricut (frame)
punch: (small leaves) I believe it might be a McGill

Cupcake Gift Card Holder

I took my last final exam yesterday and happy danced my way through making this cupcake.  Lol!

Here is the gift card holder tutorial that I promised.  I will say that if you're going to make one, planning ahead and having everything ready will make any new project go so much smoother.  Just like when you're about to make a new recipe with a lot of ingredients, it's good to be prepared by having everything measured out and things brought to room temperature if need be.  Of course, I'll guide you hear and clue you in there so you know what to expect ahead of time.

Let me show you the finished product.

I have seen these made with smaller flowers, ribbon and flower combos, large red beads or bells for the cherry on top and with bits of lace tucked here and there.  The possibilities are endless and the color combos could match anything you want them to.  I personally love chocolate cupcakes with pink frosting.

Okay, so let's get started.


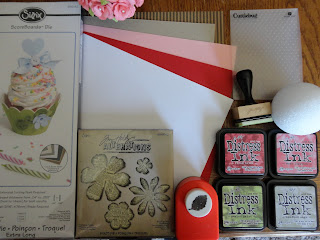
Here are the things that I used for mine.  Not shown is: my hot glue gun, my favorite liquid adhesive, long white pearl head pins, three brads, tweezers, a paperclip (one of those heavy duty squeezy ones) and chipboard/cardboard.

Here is one way to make the base of the cupcake.  I used chipboard, DP (decorative paper) and my Sizzix die called Cupcake Holder, Ruffle. It's an extra long Bigz die that works in the bigger machines like the Vagabond, Big Shot, Cuttlebug or I used my AccuCut with a converter. There is another way to make the base without a die and Julie Price's blog has a tutorial that you can check out by clicking HERE.  If using the die, I highly recommend adhering your paper to the chipboard BEFORE cutting because it was a mess trying to get things to line up right before the glue started drying.  Just glue the paper down, us a brayer to smooth things out if you have one, and let it dry completely before running it through the die-cut machine.  I used three brads inserted in the holes to hold it together.


Once the base is together, cut a 3-inch Styrofoam ball in half with a serrated kitchen knife.  It is surprisingly easy to cut.  Please be very careful!  Then I put a generous amount of hot-glue inside of my base, slipped a gift card between the two halves of foam and positioned the ball like so.  Don't take the card out until the glue has dried thoroughly.  I have seen this done using foam tape between the halves, but to me it's more hassle than it's worth.


So far so good, and now it's time for the decorating.  I used the Sizzix Bigz die by Tim Holtz called Tattered Florals.  I cut out 48 of the medium sized flower (45 pink and 3 red), embossed them using the small dot embossing folder by Provo Craft, and then inked them up using my distress inks. 

I love to make my flowers but if you don't have the equipment to do that or you want to save a lot of time, store bought flowers work perfectly fine.  I have been known to buy bouquets of flowers from the floral department at Michael's and then just rip all the flowers off of the stems and glue them to my projects.  Saves lots of money since those little packages of flowers in the scrapbook aisle can cost $5.00 for six flowers.  I have 16 flowers on this project so....  I don't know about you but I can think of better things to spend my money on. 


After  shaping and hot-gluing my flowers together, I ran a pearl head pin through the center before the hot-glue hardened completely.  This made it easy to arrange the flowers.  Once positioned right, I put hot-glue at the base of each flower to hold them securely but left the pins in place. 

Don't you think the pearls make the flowers so much prettier?  I added 3 more flowers to each side of the gift card.  That's 9 flowers on the bottom and 6 flowers on the top.

My flowers need leaves.  By gluing the leaves on after all of the flowers are in place, I covered up the little gaps in between them.  Otherwise, you would be able to see the Styrofoam in some places.  I used about 20 leaves.


I hot glued the red rose and 4 leaves to one of those squeezy paperclips that hold a lot of papers.  Sorry, I don't know the technical name for them or if there even is one.  If you happen to know, please let me know in the comments section at the end of this post.


Slide your gift card into the paperclip.  The arms of the paperclip should slide nicely into the gap between the foam but if not, just give it a little shove and that Styrofoam will give way. 


So there you have it.  Isn't it pretty?  Believe it or not, that gift card is hiding in there. 

If you have ANY questions about how this was put together, products I used or where you can purchase them, ask away in the comments section and I'll answer as quickly as possible.

Thank you so much for visiting!  Have a great day and an even better tomorrow!

♥  Laura C.

Saturday, May 5, 2012

Kendall's 2nd

Hooray!  I finally found a few minutes to get this birthday card finished between homework and studying for finals.  I'm SO excited for summer break for a lot of reasons, including making and posting more projects.  So after this Thursday I can create and play until mid August!  Woo Hoo!

I am entering this card in several blog challenges and since the challenges' color schemes allowed me to use pinks and spring colors, I thought of my niece Kendall who will be turning two at the end of this month.  So this card is for her.


This adorable Magnolia stamp is called Congratulations Tilda and she is supposed to be holding a gift.  One of the blog challenges had "masking" as part of the challenge and so I replaced the gift with a cupcake stamp called Tilda's Cupcakes.


Blog challenges I would like to enter this card in
Magnolia Stamp Lovers Challenge (Stitching),
The Sketchy Challenges (Cordine's Sketch),
Magnolia-licious Challenge Blog (Spring Colors and/or Cupcakes),
7 Kids College Fund Challenge Blog (Make It Cute),
Midweek Magnolias (May Flowers) 
Colour Create Challenge Blog (Use colors of Rose Pink, Kraft and White and an added challenge of Masking).

Products I've used in making this card: Stamps - Magnolia (Congratulations Tilda and Tilda Cupcakes) Inks- Copic and Memento, Cardstock - Bazzill, DP - Recollections and Doodlebug, Dies - Quickutz (balloon and corner) Sizzix (tattered florals, once upon a time and tags) Martha Stewart (swirly edge) MISC - ribbons, gems and wire are from my stash.

Thank you so much for visiting!  Until next time...
Related Posts Plugin for WordPress, Blogger...